One morning, while listing through news and warming up for the working day with a cup of coffee, I find this topic on Reddit about Meeting C++ in Berlin. Now, ticket for Meeting C++ isn’t something that I could afford for myself, and my company probably isn’t interested in paying it. So I took a chance and applied for a supportive ticked.
Couple weeks later I got an email from Jens informing me that I got a supportive ticket. Excellent! Instant happiness hit me hard, and I immediately confirm my attendance and reserve the flight and accommodation.
Fast forward week ago, there I am at the opening of the conference. The room full of people, and Jens starts the opening talk. He represents sponsors who did this and that, and that… And as much as that’s not the most interesting part of the conference I heard that there are sponsors who sponsored supportive tickets (aka my ticket). It was Native Instruments and Conan. So this blog is actually a way to say a BIG thank you to the Native Instruments and Conan for supporting my ticket, and an intro to an ongoing series of couple blogs where I will write about some interesting stuff I heard at the conference.
You can check more about the conference here, and check the slides here.
Here is a sequence of commands which may be handy when debugging with GDB. It’s a sequence which allows you to go through the execution and log all the output into a file. And it does that automatically.
set logging file output-file.log
set height 0
set logging on
set logging redirect
while 1
si
end
with first command we set a output file where we expect our log after the execution
set height sets our screen size, overriding it to 0, so we don’t get messages like this:
“—Type <return> to continue, or q <return> to quit—“
logging on enables logging
and logging redirect doesn’t show output on the screen (which slightly speeds up the process)
while loop executes commands inside the loop while the program is running. Instead si, you can use n, ni, s or any other like p or maybe x/i $pc. Just be sure to use at least one command like s or n (which execute), so that you don’t end up with the loop running indefinitely.
Regardless I’ll explain the checkout and build procedure here in my words, emphasizing things that were unclear to me when I was checking out the Clang/LLVM for the first.
Wyvern, the LLVM logo
Checkout
So first thing is to choose a version control software which you want to use. You can choose between SNV and GIT. Checkout here a bit more on that.
At the moment of writing this text LLVM is using SVN primarily, but there is GIT repo and initiative to move it to GIT primarily (https://llvm.org/docs/Proposals/GitHubMove.html).
Anyway when you decide between SVN and GIT, you can use it to checkout the project. Use following commands in terminal:
svn co http://llvm.org/svn/llvm-project/cfe/trunk llvm-src/tools/clang
Now you have clang in your llvm-src/tools directory (just the place it should be).
So from this step, let’s try to build it for your platform (x86 I guess).
Building process
The code you have checked out is a source code. From that code you are gonna build a project into executable binaries. First, create a folder where you want your build to stay. Let’s call it llvm-build, and then enter it.
mkdir llvm-build cd llvm-build
Now execute following command, with appropriate modification if the path to your llvm-src folder is different.
First option ‘-DCMAKE_BUILD_TYPE=Debug‘ means that the project will be built in Debug mode, which will allow you to run it in gdb. If you don’t need it, replace Debug with Release.
Second option ‘-DBUILD_SHARED_LIBS=True‘ means that libraries will not be linked statically, which will result in much faster compilation and the process will be less memory hungry. If you don’t have specific reason to link it differently, use this one, trust me.
The last one i the path to the source folder.
Press enter, and watch how cmake is configuring a build. It might happen that you don’t have some libraries or necessary tools on your system; in that case cmake will result in error. Just install these tools, and then run it again. If you believe that cmake got stuck, and every time you run it, it just doesn’t work for some weird reason, you can also run this command from the llvm-build folder:
rm -rf *
Be careful with this command and take care that you are in the folder llvm-build. Then run cmake again.
Once cmake finishes successfully, hit the following command:
nice make -j6
Now go for coffee break or enjoy watching your llvm building.
Testing if everything is fine
LLVM and Clang come with a bunch of tests that verify that everything works as expected. When some developer implements a new feature, he/she also provides a test for that feature. So when someone else is working on LLVM, they can easily check if they did not break something. These tests are called Regression tests, and they don’t cover all possible functionalities, so if you implement a new feature and none of the tests fail, that does not mean you did a good job. Furthermore, you should think about test you can write that is going to test all cases of your new feature.
Anyway, to run these tests, type the following:
make check
or:
make check-all
You can also type something like this:
make check-llvm-codegen-mips
which will check only llvm, part codegen, and architecture mips. Go and check the tests folder structure to figure out what I am talking about.
When you need to test only one test, not a bunch of them like in previous cases, you can do that with llvm-lit script located under the llvm-build/bin folder. Simply type a llvm-lit and a path to a test you want to run. Example:
Please note that sometimes developers make mistakes, and freshly checked out Clang/LLVM may have some broken tests. In such situation, just update your local repo and run the build and tests again.
More testing
Beside regression tests, there is also a test suite that you can checkout, build tests and run. But I’ll write more about that in some other posts later.
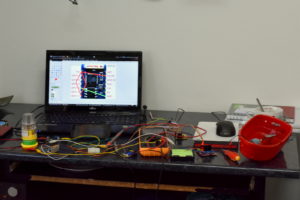
After some time spent trying to bring my IOIO back to life, I decided to move on and to equip my RCBoat with a new controller – ESP8266. It’s a cheap wireless module which became popular very quickly and got a huge community around itself. Because of its price and size it is really easy to use it to connect any device to the Wi-Fi, and to make some cool IoT device out of it. There are also several different firmwares available for it, but maybe the most popular is nodemcu, which allows you to do programming in Lua programming language. Overall, quite pretty module to have for a couple bucks.
Taking all of that into consideration, including my curiosity for the new ESP module, it seemed like a reasonable decision to use it as a controller for my RCBoat. And so it was.
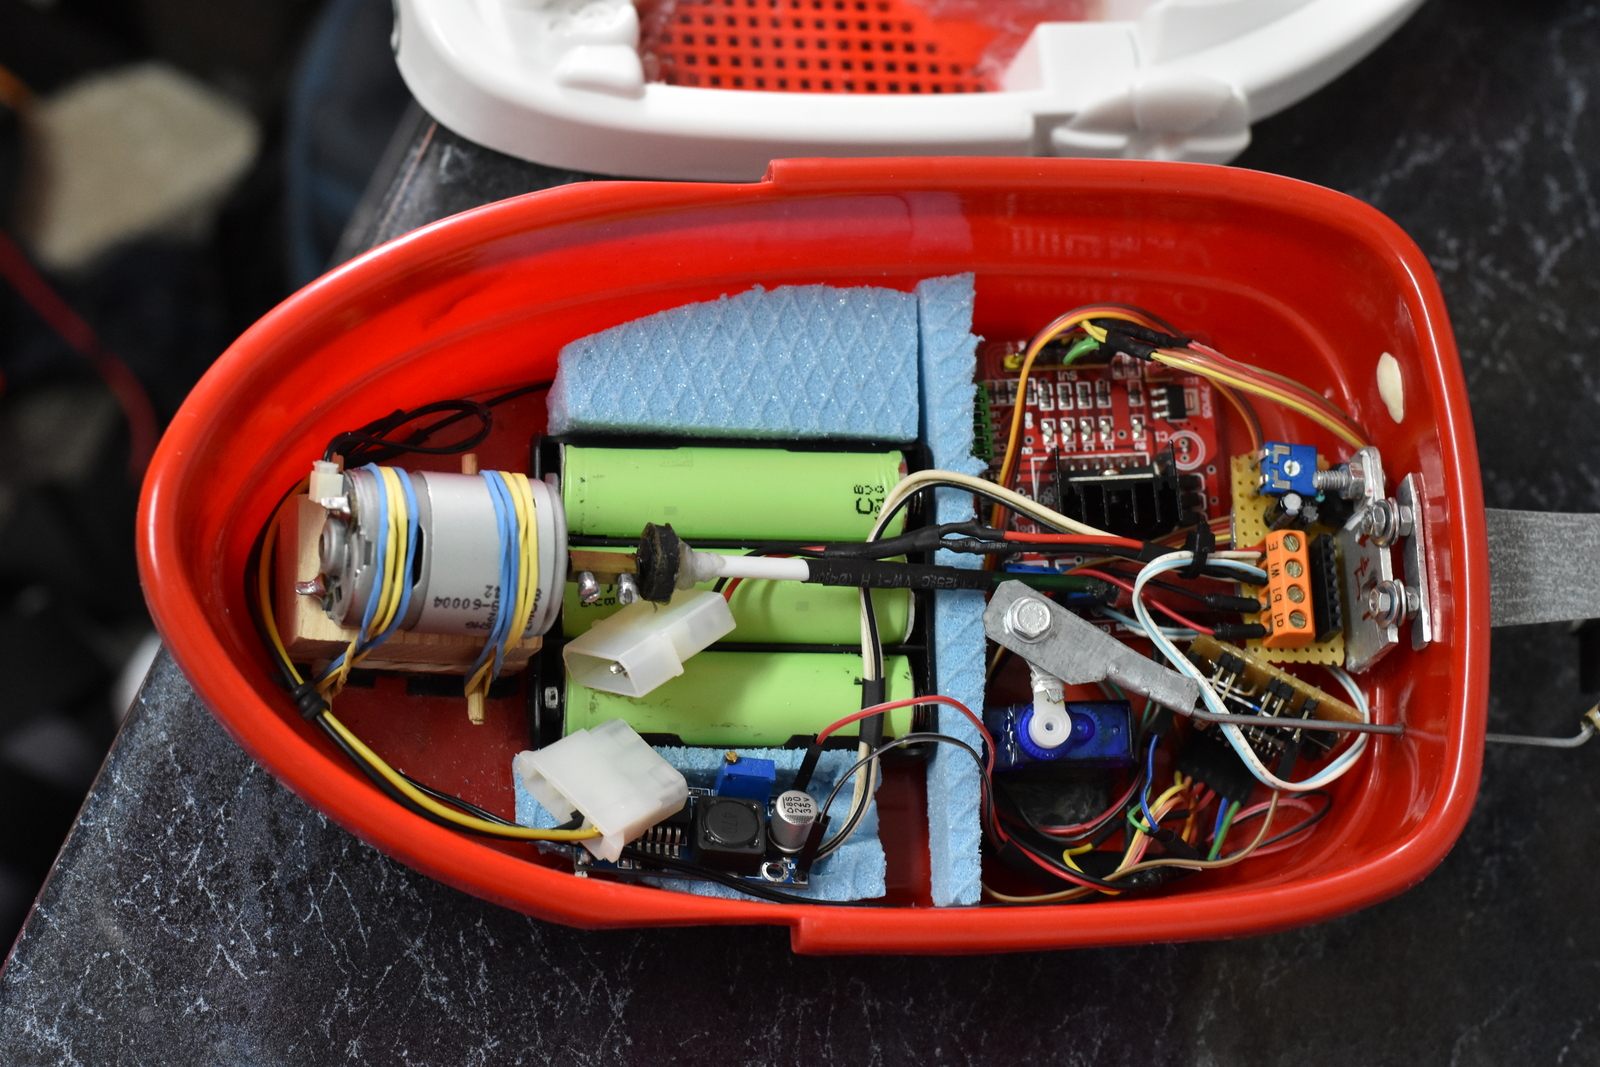
The interior of the boat had to be reorganized, a bit squeezed as ESP8266 requires 3.3V voltage regulator as well, also some mechanical improvements were made, but at the end everything fit nicely.
ESP8266 is flashed with nodemcu firmware and programmed to behave like an AP (Access Point) which allows me to connect to it using my phone. It is also programmed to receive data and control the rest of the electronics inside the boat. On the phone, I made a Joystick app, which is sending controls to the ESP8266. Both source codes for ESP8266 and the Joystick app for Android are available on my github page.
So after making a nice water sealed package and several successful tests in the bathtub, I’ve made a ride on the canal too. This time there were no connection issues, except when I pushed it quite far away. So now enjoy the video 🙂
Like many other things in Serbia, Student Center of Novi Sad is in some ways old fashioned, and doesn’t like to change how things work. One of things is the way how students apply for the student accommodation and how they pay for it. It’s very simple: you go to the office, you wait and then you apply/pay for the accommodation. No online mess and trouble. Most of the time, waiting time is short, but as deadlines approach, waiting room becomes a bottleneck and many students have to wait, sometimes even for couple hours.
Luckily, the waiting room is equipped with a ticketing machine, so one you get the number, in theory, you can go and do other things you have to do. The problem is that while you are away, you do not know which number is processed in the office, and you can easily miss your turn.
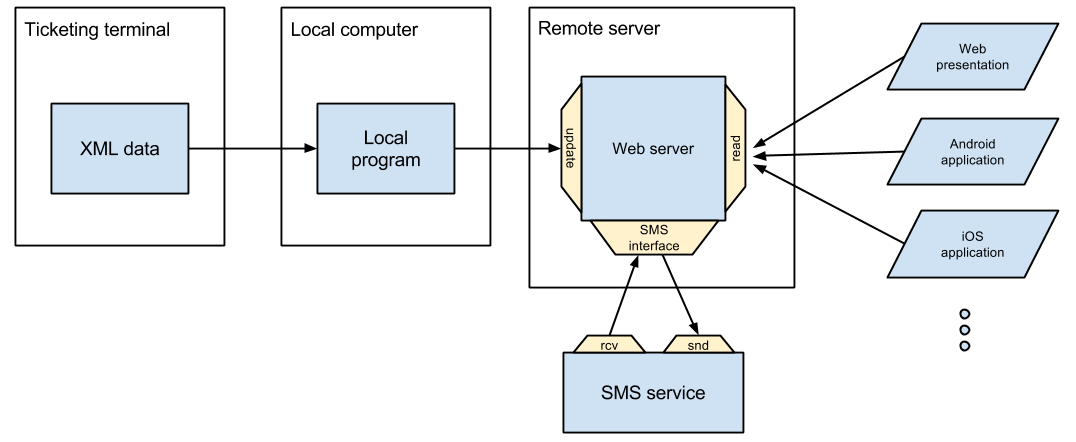
So after some time spent thinking about how could I make things better for us, students, I decided to create queue monitoring service. It would not abolish the queue you saw in the video above, but it will give students a possibility to move away freely without missing their turn. So it led to some investigation in the beginning and system design after, and at the end to some coding ofc. On the diagram below is initial system design, all together with SMS service which was never implemented due some bureaucratic reasons.
Excluding that, everything else fit well and is working well since it was installed. Ok, maybe not always; sometimes it does happen that local computer stops working, and that service stays outdated for couple hours/days. Right now, the idea is to change ‘local computer’ on this diagram with Raspberry PI, and leave it somewhere in the dark forever alone to do its mission.
Anyway, you can download an app for Android here, or check status online here, but if you are not a student in Novi Sad, then this information might not be useful to you. The thing that might be useful to you is on my github here, and it’s a source code for the local service and Android app. Maybe you can use it and help someone else not to wait in the line for too long 😉
Couple days ago I had to help my friend with some web project he was finishing. He asked me if I’m familiar with CSS and the first thing that came to my mind was this:
CSS
But I was like “Challenge accepted!”. There were more tasks and one of them was to create search box. And to keep story short, here is the result:
Animation
You can download the source code here. Feel free to post your opinions/bugs in the comments 😉
While doing on some project I found myself in situation where, when parsing JSON data, if server thrown an error (syntax error for example), I finished with only parsing error. Without information what happened wrong (without data that server returned), I was unable to solve the problem. So I decided to create function parseJSON2. Not to much creative name, but it did the job. Here it is:
So this is the result of using prepared statements in PHP on not so comfort way. Each time when I had to perform some query, I had something like this in my code
<?php$stmt=$con->prepare("SELECT * FROM table WHERE id = ?");$stmt->bind_param("i",$id);$stmt->execute();$results=$stmt->get_result();?>
First problem occurred when I wanted to use this code on server where MySQL native driver for PHP was not enabled. When driver is not enabled, using get_result() function is not possible. It was free server, something I was doing just for fun, so it was not possible either to contact support or to install it by myself. Then I had to change the way I get results. And I had to do that on every single line in a code where I had query. A lot of work.
Second problem was a lot of repeating code which I don’t like. And I wanted to catch errors (which I didn’t do from the beginning). Again, I had to change my code on every place where I had query executing.
So I decided to create function, which will do executing queries instead of me. I Googled a little bit, and found this.
That allowed me to create function like this:
<?phpfunction prepareAndExecuteQuery($con,$query,$bindString,$bindArgs){if(!is_array($bindArgs))exit("prepareAndExecuteQuery - bindArgs not array");$n=strlen($bindString);if($n!=count($bindArgs))exit("prepareAndExecuteQuery - bindString params count not equal to the bindArgs count");$a_params=array();$a_params[]=&$bindString;for($i=0;$i<$n;$i++)$a_params[]=&$bindArgs[$i];$stmt=$con->prepare($query);call_user_func_array(array($stmt,'bind_param'),$a_params);if(!$stmt)exit("prepareAndExecuteQuery - Binding parameters failed");if(!$stmt->execute())exit("prepareAndExecuteQuery - Execute failed - ".$stmt->error);$result=$stmt->get_result();$stmt->close();if(!$result)exit("prepareAndExecuteQuery - No results - ".$stmt->error);return$result;}?>
Now when I have to execute some query I do it this way:
<?php$sql="SELECT * FROM table WHERE id = ?";$result= prepareAndExecuteQuery($con,$sql,"i"', array($id));?>
Less code and much more flexibility. If one day I decide to change something in execution of queries, I’ll have to do it just at one place.