Browse Category: Photography

Chasing the Sun

Recently, I posted this photo to my Instagram account.

Unexpectedly, some media shared the photo, and soon enough it went viral. Well, mabye better to say “locally viral”. But at the same speed, comments like “it’s fake” and “it’s photoshoped” arrived. Tbh, I didn’t care much. There was something in that feeling of having my own 5 minutes of fame, that made me want enjoy the moment, and not to get into dispute with these who doubt. But at the same time, I understood them. I also couldn’t believe with my own eyes when I saw that yellow blob on the back screen of my camera.

Anyway, what I want to share here, is the process I went through before I made this shot. And it starts way before I clicked the shutter button for the pic above.

Intro

Last autumn I decided to challange myself and to improove my photography. For two weeks, every morning before job, I was wandering around the city, looking for inspiration. Couple days into explorations, and I figured out that it was the period of the year, perfect for foggy mornings, so I focused my exploration to the areas around water.

But not every location “behaved” the same way, so I started thinking more about where exactly the sun will rise, what are the weather conditions, temperature in the morning etc. I made some shots I was happy about and then the winter came. My beautiful mornings with a golden sunrise were over, but the experience of searching for a perfect location stayed.

Searching for a location

This part is about finding a potential spot for making a nice morning photo. It also applies for shooting a sunset though.

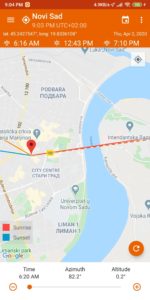
The sun does not rise exactly on the East. Tools like suncalc.org or Android app Golden Hour can show where exactly (azimuth value) the sun is rising (and setting) on a given date, relative to some point on the map. You can use this info to visualise the scenery if you are familiar with it, or to make some predictions at least if you are not.

Golden Hour app, showing a position of the sunrise on April 2nd

For example, if I want to shoot a famous “house on drina river“, using the mentioned tools, I can at least have an idea how the result photo will look like, and that, if I want to see the sun setting down behind the house, I need to be there probably in January.

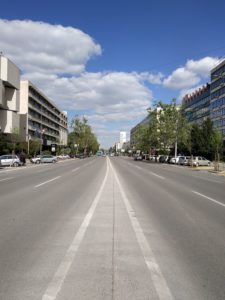
Having the above on my mind, somewhere at the beginning of the year I did a homework and ‘scanned’ the city I live in (Novi Sad, Serbia) for the sun alignments with some landmarks, streets, buildings.. I am familiar with the surroundings so it was easy for me to visualise the result. One boulevard that I found pretty interesting is straight for one kilometer, ends with a bridge, and at some point the sun will rise just “behind” that bridge. That seemed cool in my head and I noted that date. April the 2nd.

Exploring the location

I went to check the location about month before and it wasn’t anything special. Here’s the proof below, made later though. I was also disapointed because the bridge was invisible because of the distance. Lucky me, I had a Nikon 200-500mm collecting dust, and considering that, the idea seemed feasible.

Same location, nothing special

While exploring the location, I thought about where I want to ‘put the sun’ on my photo. I thought it would be cool to put it ‘on top of the bridge’. But to be very precise and to have the sun “click” at the top, you need have it at the exact altitude. Apps like Dioptra can give you aproximate value, but there is an error. Mostly due sensors imperfections in your phone.

The target was set on top of the bridge, and the altitude value (on the right) is 1.8 degrees.

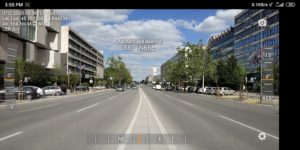
For example, the altitude value above is 1.8°, but sun’s altitude on April 2nd when I took the photo was 0.2°. Azimuth value (66°) also differ from the one in Golden Hour application or Suncalc.org (82.2°). So take these values with caution. If you are able do the some math on the paper, based on the altitude of the object where you want to ‘place’ the sun, and the distance. Simple arctan function will do.

Before the D-day, check the weather

On some other occasions I was waking up really early, driving couple hours to get to the location, just to see clouds. So check what the local weather predicion is saying.

D-day, be there early and setup your equipment

You want to be there at leas half an hour early. You will need some time to unpack your gear, to setup the tripod, take test shots. Check different framings, change positions. You don’t want someone else to take your perfect spot.

Set correct exposure, ISO, aperature. Keep in mind that as the sun goes up (or down) the ammount of the light changes drastically, and you need to update your settings accordingly. But at least have some initial settings set.
Try to decide what you want to achieve. My reasoning was that I will be shooting right into the sun, so I was afraid of having too dark and too bright areas on the photo. I was bracketing with +/-2 exp for that reason. Also, there was traffic going around, and I thinked about the postprocessing, so I made multiple shots, just so I have material to erase a car that I don’t like later.

Wait for the right moment

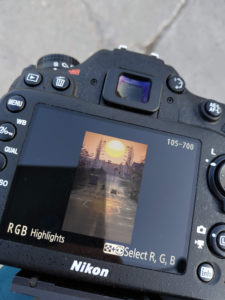
It’s easy to say. As I was shooting straight to the sun, I was watching the frame in live view mode (if you are shooting directly into the sun, with 500mm, you probably don’t want to look through the viewfinder). When I actually saw with my bare eyes this big yellow blob “moving” on a LCD (totally unexpected), I lost my mind a little bit. At that point the sun was still to the left of the bridge and quite below, but it was impression. I started shooting way before the right moment, in a fear that I will miss something.

Take that shot

When the sun parked between the light poles on the bridge, I knew I had the shot. But I continued shooting more material (for the purpose of removing cars if needed).

Go home, and take some more sleep probably..

At this point, this tutorial ends.

Bonus: Photo ‘aftermath’ for the suspicious

As I already said, I had no idea that the sun is going to be that big. I was amazed! People who didn’t witnessed this scene are suspicious. And I understand them. Sun is very big and looks like clipart. So here is a bit of math just to proove the dimensions on the photo.

For this purpose I used lens calculator and google.

I took a photo on Nikon D7200 with Nikon 200-500mm, at 500mm, f8.0.
Using google maps I measured my distance from the bridge, and the bridge width. It might be a bit unprecise, but it will do.

Distance from photographer to the bridge top = 1000m
Focal length = 500mm
Nikon crop sensor

If you enter these data into lens calculator, you get the following result for the vertical angle of view:

Vertical FoV = 31.2m

I shot a photo in portrait orientation, so vertical and horizontal axes are swaped basically.

Using a bridge width (14.2m) measured on google maps, and the result from previous step, we can calculate the ratio of the bridge width on the photo like this:

Ratio = 14.2m / 31.2m = 0.45512

If we multiply ratio with the photo width (original, not cropped), we get expected bridge width in pixels on the photo

0.45512 * 4000px = 1820.48

Cool, now let’s measure the bridge on the photo. At first, I was measuring from fence to fence and I got a result that differs about 90px from the calculated value. It could be a measurement error, but then I figured that light poles on the bridge actually goes behind the fence. Doing another measurement, between tops of the light poles, I got a result of 1818px. And that’s, as expected, quite close to the calculated value.

Now let’s use the values for the sun. Google the sun diameter and earth to sun distance, update the values in lens calculator and update the formula:

Sun distance fom Earth = 150.91 million km
Sun diameter = 1.3927 million km

Vertical FoV = 4.71 million km

Ratio = 1.3927 / 4.71 = 0.29569

Expected sun diameter in px = 0.29569 * 4000px = 1182.76
Measured sun diameter = 1171px

It’s about 10px error. Nobody would bother to photoshopt a sun just 10px larger. So there you have. Math proof.

Right time for photography!

This year, the autumn made me fill my memory cards faster than I had time to empty them. Weather conditions in past several weeks in my surrounding (and probably wider) made mornings extremely photogenic.

Waiting for the fish by Aleksandar Beserminji on 500px.com

Nights were cold, days were hot, and that created a lot of fog in the mornings, just above the ground and especially above calm water. While it was raising up, sun rays were coloring it to a golden fire.

All that made me want to wake up in the 4am, enjoy it, and have an adventure every morning. Although, the adventure was actually beginning the evening before, while I was planing where I will go in the morning, while the city is still asleep.

Checking the weather conditions, calculating when and where the sun will rise (suncalc.net) and searching for a location where the sun will potentially align with something interesting, as well as planning how and from which side will I approach the location.

Swan in the morning

When the sun finally goes over the trees and burns all the fog, I was going home with a memory card full of photos. Sometimes I was muddy and wet to my knees, but I was sure I have photos I will like.

Which camera type should you buy?

Recently I noticed that almost all compact cameras are exchanged for phones or big DSLRs. I never actually counted how many people (mostly tourists) are using compacts cameras or DSLRs, or nor I did any statistics, but all these big cameras are somehow eye-catching. It became trendy. So I have decided to ask some proud users of DSLRs (again, tourists and some acquaintances) what is the reason for buying one. Answers were mostly similar and refer to image quality and affordable price.

Now, I really don’t mind someone else carrying big and heavy DSLR around their neck, but let’s see is it really necessary.

It all starts with the light. If there is no light, there is no photo. That’s why it’s important to handle the light properly. We use lenses for that. There are many different types of lenses and they affect the light that is passing through on different ways. Better quality lenses are putting through the light ‘on a better way’ so more information are preserved when the light exits the lens on the other side. And when that happens, the light will hit the sensor. The sensor is a vital component in photo formation process. It ‘reads’ the light which hits it, and transforms it into a digital signals which are later transformed into a file which you can open on your computer. The better sensors ‘reading’ skills, better results. Transformations that come after the reading are also important, but let’s keep this as simple as possible and assume that transformations are always done well and we don’t have to care about it.

So basically you need a good (big) sensor and good lens for good quality photos.

Bigger sensors are better sensors. You can find many topics about that online, but long story short, bigger sensors have better low-light performance (will make less noise in photos with higher ISO), they have better dynamic range and as bigger they become, they make more background blur.

Now let’s check sensor sizes before we continue. Here you have different sensor sizes compared from 1/3.2″ to Medium Format.

text6802

And now, DSLRs from the beginning of the story, they do posses bigger sensors (usually APS-C or bigger) than compacts, which makes them quite a good option to buy. They also come with some sort of quality lens, at least better than most compacts. But they are not the only option.

A couple years ago, manufacturers introduced mirrorless interchangeable-lens cameras. These cameras usually have bigger sensors than compacts, and allows you to change lenses. Which is cool! They tend to give you quality of photos as DSLRs do, but they are also tending to be small. Unfortunately the size of the sensor dictates the size of the lenses, so bigger the sensor bigger are lenses.

TLDR, if you want really, really good quality photos, take some mirrorless camera or some DSLR if you don’t mind carrying it all around. Otherwise, if you want something slightly better than your phone photos, take some compact. And if you don’t mind the quality of your phone photos.. well, then you have no problem 🙂

UPDATE: Below you can find a comparison of camera types, cameras and sensor sizes, which might be helpful to illustrate the described situation.

g5565

Sync your clock when shooting with a partner

One day, totally at random, some guy asked me on the street if I’m am being available to cover an event that they organize. I am a hobby photographer and usually I shoot what I want, when I want, where I want, and I didn’t have experience with such things. But I accepted the challenge. It was a Cameroonian association dinner party, followed with many different activities with 100+ people present.

DSC_1027

After I got timeline of the event and started planning everything, I realized that I might not be ‘enough’ to cover everything as I am not skilled enough. So I decided to call a friend for help. She accepted the invitation, we did quite nice job and the client was happy at the end.

DSC_1203

But even though I tried to think about everything I didn’t think about how are we going to merge our photos after the shooting, and that gave me a small headache. When I copied all the photos (~2×500 photos) from our memory cards, I found out that I have a bunch of photos, with no pattern I can use to separate them. So I had to do it manually, and there was a lot of job, because that celebration included many different sections: red carpet, opening ceremony, prayer, dinner, drama, fashion show, etc. I lost maybe 15-30 minutes on sorting all the photos, and maybe it’s not too much, but I would be more happy if I didn’t have to.

Check these instructions (Sync Multiple Camera Time Stamps In Lightroom 4, Fix Timestamp Issues on Multi-Camera Shoots) if you’ve already did the same mistake.

So I was thinking what could I do to make it better next time, and realized that I can sort photos by the time they were taken. But there is a catch: for that you need to sync clock on your cameras that you are doing shooting with.

clock sync

If you are using more cameras or if you are shooting with a friend, just take some time before and configure your clocks to show the same time. After that you can easily sort them by time on your computer.

Does more/better equipment means better photos?

When I was a kid, before I went to school, my aunt was very ambitious to teach me how to read, and that resulted in me knowing how to read and write in preschool. But then in the first grade we had these stickers with the alphabet, and we were doing exercises where teacher proposed some word and we had to recreate that word using stickers. I had these stickers, but unfortunately I didn’t have this nylon holder as you can see on the photo, and every time we had to create proposed words, I had to search for the letters through the pile which made me the slowest kid in the class.

Slovarica-za-prvi-razred_slika_O_39262133

The situation got so serious that teacher thought I have problems with studying and called my parents. The problem was that this nylon holder was hard to find, and my parents had to order it from somewhere far away, so it introduced an extra delay in delivery. At the end everything was good, but I still remember all my frustration back then.

So how do I find the correlation between this incident and photography? Well, many times I have a great idea or opportunity for a photo, but I am unable to realize it because of the lack of the equipment. Sometimes it’s possible to improvise, sometimes it’s not, and here are just a couple examples of what am I talking about.

Tripod

A tripod is a great piece of equipment even though many young photographers underestimate it. Especially now when cameras go up to ISO 12800, so it’s possible to shoot with shorter expositions even in dark places. But once when all that noise, which high ISO causes, starts to bother, the only option which remains is to find some steady spot and shoot with longer expositions.

So here is an example from when I was visiting Lapland with friends, and wanted to make some photos of auroras. When we finally got a chance to see some, I made couple test shoots and determined the best* setup. While I was doing that, friends already laid down and watched the show, so I decided to change the frame and put them into it.

Aurora borealis by Aleksandar Beserminji on 500px.com


 * This photo was shot at ISO 400, with 30 second exposition and aperture f3.5. I would go for higher f-number and lower ISO, but I didn’t have a remote trigger with myself (big mistake!), and camera settings didn’t allow longer expositions without the trigger.

In this situation I was lucky to have a tripod with me. I remember other friends improvising with bags, chairs, even making stands out of snow. It can work, but tripod really helped me out in this situation.

Beside this responsibility of tripod to help you take long exposure photos, you can also use one for keeping the camera steady while making HDR photos, for selfies and also for defense of wild animals that might attack you while photographing in a wild. In that situation, it’s a life saver 🙂

Lenses

Usually, when people buy their first exchangeable lens camera, they get some kit lens with it. Most of the time it’s 18-55mm f3.5-5.6 kit lens. It’s pretty good lens for the beginners, I’m using it quite much as my all around lens, but it has its own limitations. The photo above was made with a Nikon 10-24mm at its widest 10mm. I tried to shoot with a mentioned kit lens first, but photos weren’t that ‘nice’. They just didn’t transfer that feeling I had back then. TBH it wasn’t even my camera as I was shooting with Canon back then, so I had to borrow everything from a friend.

Following photo was made with a telephoto lens. I had my digital camera with me, but as I had only my kit lens for it, I was also carrying an old Zenite SLR with 200mm lens mounted on it. I could call it a half-way improvisation, and in this case it worked.

7009632527_a0a593675e_o

Flash

The built in flash can be useful in some situations, but in many times it’s useless. Some of the weakness of a built in flash are its power and fact it could not be taken off. You can find some solution how to use built in flash in a better way (sry it’s on Serbian, translation in progress), but there is a reason why they make external flashes.

So here is another example.

DSC_5880

I made this one with flash positioned behind the subject instead on the top of the camera, turned to shoot at the background. It was some old flash from some old camera and it was triggered by improvised cable. Way too much time spent on trying and trying, but at the end, I caught some nice moments, which would not be that nice if I shoot with built in flash. One more time, equipment wins.

Conclusion

I believe this gives you an idea, which you can apply to any piece of equipment. The more/better equipment gives you an opportunity to take specific shots, therefore you can make some good photos. Though in this blog, I presented examples which do require some specific equipment, it doesn’t mean you need all that equipment immediately when you buy a camera. In order to make great photos, you need to know first which equipment to use in which situation and how to properly utilize that equipment.

So when is it the right time to get new equipment?

For me it works the best when I get a feeling of limitation, when I cannot create the shoot I want with the equipment I have. Then I need to figure out how to get over it. Sometimes I finish improvising, sometimes I buy a new piece of equipment.